
How Do Hungry Worms Nourish and Enrich Soil?
Conceivably no other living organism in the soil is as significant as an earthworm in helping to increase soil healthiness. Earthworms increase soil ventilation, penetration, construction, nutrient sequence, water movement and plant development. Hungry Worms are one of the main decomposers of organic matter.
Earthworms can play a diversity of significant functions in ecosystems. Their eating and digging events incorporate organic deposits and improvements into the soil, boosting decomposition, humus creation, nutrient cycling, and soil structural development (Mackay and Kladivko, 1985; Kladivko et al., 1986).

Hungry Worms Can Eat Half Their Weight Every Day
Earthworms do not have a Skeleton, Arms or Legs. However, they do have Loads of Muscles and Five Hearts.
They don’t have much pigmentation either, so they usually look white, gray, pink, or reddish brown. Some earthworms have red blood, and you can see it through their skin. Their skin produces slimy secretion that helps them slide through the soil.
Earthworms are hermaphrodites. Each has both male and female sex organs, but they cannot inseminate themselves. Worms mate by joining their clitella (Swollen area near the head of a mature worm) and exchanging sperm. Then each worm forms an egg capsule in its clitellum. Earthworms pass most of their lives below ground, creating complex tunnel networks. They make an essential contribution to soil fertility and are therefore very important in gardens and farmland.
Worms channel deeply in the soil and bring subsoil closer to the surface mingling it with the topsoil. Slime, an excretion of earthworms, contains nitrogen. Nitrogen is a significant nutrient for plants. The gummy slime helps to hold bunches of soil particles together in creations called aggregates.
Earthworm Hearts: Worms don’t have just ONE Heart. They Have FIVE!
Worms do not have a multi-chambered heart like mammals and reptiles do. Instead, they have 5 single-chambered aortic arches (functions similar to a heart) which pumps blood through their body. The 5 hearts are close to the head of the worm. But their hearts and cardiovascular system aren’t as complex as ours by a long shot.
Because worms are cold blooded, they can’t regulate their temperature like mammals can. This means their body temperature will be the same as their surroundings.
Moving around: Worms have two kinds of muscles beneath their skin.
Click Link Below to See Some Exceptional Worm Diagrams
https://www.sas.upenn.edu/~rlenet/Earthworms.html
Worms Can Regenerate Some Segments of Their Body
This is one of the most misinterpreted worm truths. If you cut a worm in half, contingent on where the cut is, it can renew lost sections. Worms have 5 hearts located close to the head and before the clitella. If you cut a worm behind the clitella, then it may be able to renew its tail.
Worms Breathe Throughout Their Skin and Have No Lungs
All existing animals require oxygen. Worms cannot breathe in through their mouth, and they don’t have a nose. Instead of lungs, worms have a thin penetrable skin through which oxygen in air moves through. The mucus on a worm’s skin helps to dissolve the oxygen. Consequently, the moisture level of the worm bin needs to be satisfactory. If a worm dries out, they smother. Likewise, if a worm’s environment is too moist, they drown.
Worms Will Become Injured if Exposed to Light for Too Long
Worms live in the dark and are very sensitive to light. They do not have eyes but can detect light through their skin. And they will move away from light so that their skin stays moist. If worms are exposed to light for about an hour, they will become paralyzed and unable to burrow back into the darkness.
The Normal Lifespan of a Worm Is About 1-2 Years, however, They May Be able to Live Up to as Long as 7 Years
The life span expectation of worms can vary widely depending on the species. In a protected and stable situation, some species of worms can live up to 4-7 years. In typical, the average life span of a composting worm is about 2 years.
Worms Have Small Hairs on Each Section
Worms have tiny bristles, known as setae, on each segment. The setae help it move through soil and allow the worm to grasp the adjacent soil. The setae are very strong and formed from the same material that makes up our fingernails.
Baby Worms Hatch from Cocoons
An established Red Wiggler worm can produce 2-3 cocoons per week. Cocoons are tiny, lemon shaped and yellow gold color. For Red Wiggler worms, the fledglings inside the cocoon can take up to 10 weeks to mature before they hatch. Each cocoon usually hatches 2 to 4 baby worms. Cocoons can be inactive for years until conditions are right.
A worm cluster can double in population every 60-90 days.
Worms Digest One-half of Their Body Weight on Average Every Day
Worms are fast food producers and can digest about half of their body weight each day. The typical food waste from a family of 4 would need about 2,000 worms to process each day.
DIY Hungry Worm Farm
Beginning a worm farm is a delightful way to reprocess food surplus at home. It makes the perfect organic nutrition for your plants and soil. When you understand the basics, worm composting is relaxed and enjoyable.
- Moisture should be between 60%-75%
- Ideal pH is between 6 and 7
- Optimal C:N ratio between 25:1 and 30:1
- Ideal temperature is between 59°F – 86° or 15°C – 30°C
- Aim for equal portions of greens and browns
- Worms will eat fresh food and foods they like first
- Water slowly evaporates and is absorbed by browns
- Worms eat can eat roughly half of their own body weight each day (assume a worm weighs 4.5g)
- Uneaten greens will rot or ferment after a few days
- Worms eat less and do not reproduce when conditions are not right
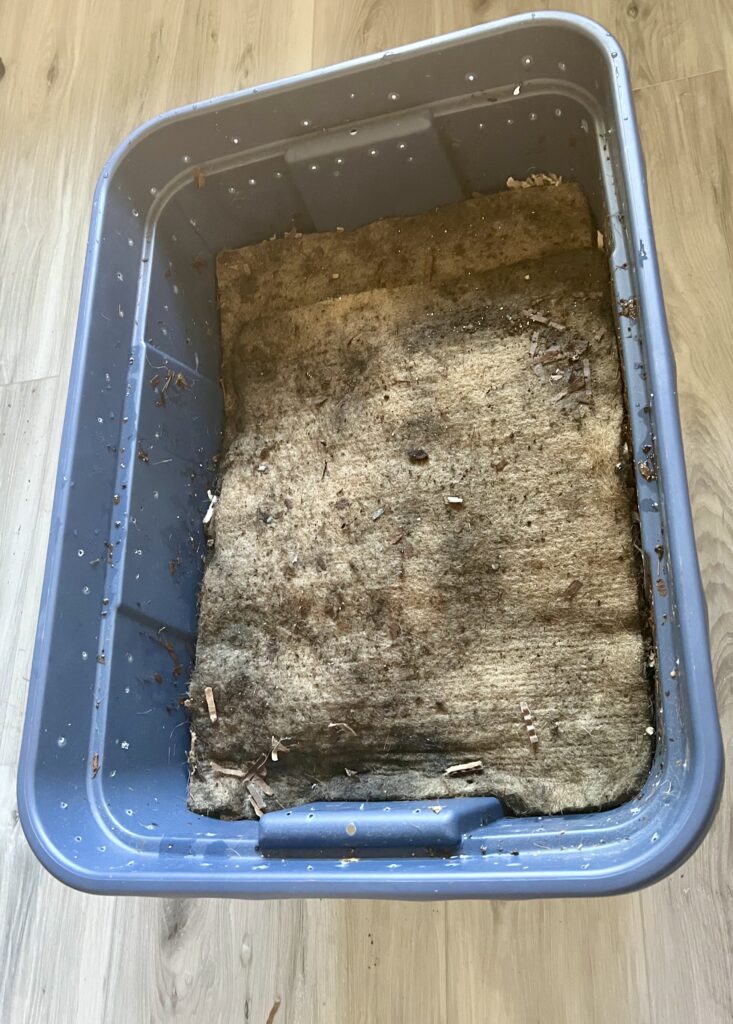
How to Make Perfect Worm Bedding for Thriving Worms
Torn newsprint makes excellent worm bedding material.
In place of soil, composting worms live in damp bedding material. Worm bedding refers to the material that is both high in carbon and moisture permeable. It makes a habitat for worms to flourish in. And if the circumstances in the bin are not quite right, it gives your worms some momentary breather. The most important step in setting up a worm farm is selecting the right bedding material. The ongoing moisture level of the worm bin bedding is also important.
Worm bin bedding usually contains of a mix of carbon materials and needs to be at about 60%-75% moisture level. The bedding material should feel like a damp sponge, moist but not soaked.
The Top Bedding Material:
Worm bedding is a long-standing food source for worms. In fact, up to 50% of a worm’s diet may consist of its bedding. Bedding also helps to keep the bin conditions stable in general (acidity, humidity level, oxygen content, etc.)
Characteristics of Great Worm Bedding Material
Odorless
Allows Oxygen Movement
Absorbs and Holds Moistness
Is pH Neutral
Blocks Out Light
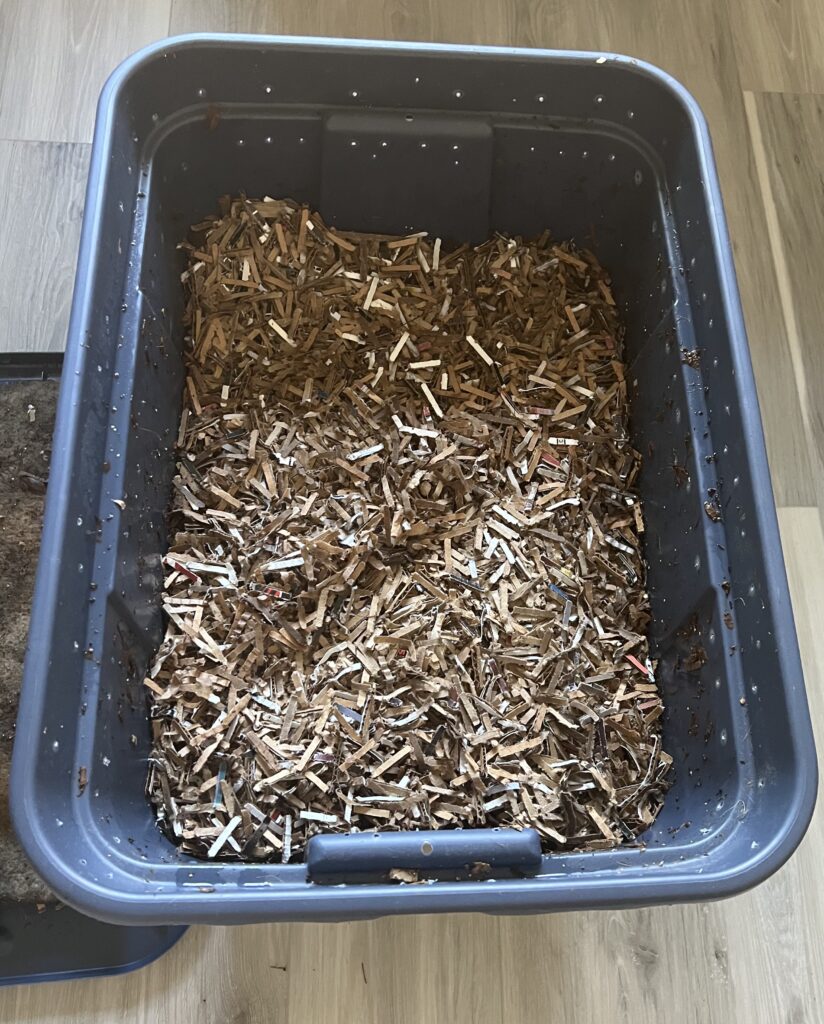
What to Use as Bedding Material
This is a list of everyday bedding materials you can add into the worm bin.
- Brown cardboard (cut into small pieces)or shredded
- Paper (not bleached white office paper), and shredded
- Fall leaves and other yard waste
- Wood chips (not colored, shredded)
- Aged compost
- Aged horse or cow manure
- Coco coir or coco fiber
- Peat moss
- Straw and hay
The best approach is to add a mixture of bedding materials in the worm bin. For instance, some materials hold more moisture than others such as peat moss and coco fiber (coir). Bulky materials such as cardboard are better at creating more air pockets in the bin. Furthermore, hay, dry grass, and straw do provide great space for air and worm movement because of their construction.
Make sure your compost for worm bedding is aged past the compost heating stage. The heat can kill your worms.
A combination of different worm bedding materials will lead to a healthier mix of nutrients, refining the quality of completed worm castings.
See How to Add Bedding into the Worm Bin
Worm bedding material should be at about 60%-75% moisture level. Consequently you should dampen the bedding material before adding it into the worm bin to keep things moist. The bedding material should feel like a damp sponge, moist but not dripping.
To make the bin convenient only add materials that you always have available such as newspaper and cardboard.
There’s always a moisture level sweet spot, where your worms are reproducing, eating happily and look healthy. However, maintaining a consistent moisture level can be a challenge, especially due to changes in weather. Fortunately composting worms are tolerant of a wide range of dampness (50%-90%).
Make sure the worm bedding does not matt together in large chunks. This can cause anaerobic (without oxygen) decomposition and a foul odor. Once a week you should lightly lift and fluff the bedding material to create air space and to prevent it from compacting.
There should always be a higher carbon to nitrogen ratio (C:N) contained in the worm bin. For worm composting, conditions are generally ideal with a carbon-to-nitrogen (C:N) ratio of between 20:1 and 35:1. You can never add too much worm bedding on top. When in doubt, add more paper! When adding worm food into the bin, mix some bedding in to optimize the decomposition rate. Worms live in the dark and will more contentedly eat food that has been covered up from the light.
Checking The Moisture Level of Worm Bin
Sustaining a steady moisture level in the worm bin can be a trial. The moistness level of the worm compost material is important. It’s normal to see condensation on the lid and sides of the bin. The moisture levels throughout the win will be uniform as well. There are numerous issues at work inside the worm bin which effect the moisture level. This includes:
- Temperature
- Humidity
- Foods
- Bedding
- Ventilation
- Drainage
There are 2 Methods for Checking the Dampness Level in the Worm Bin:
The Crush Assessment – This technique delivers a quick and rough approximation of the wetness level in the worm farm. The moisture in the worm bin bedding should be as moist as a wrung-out sponge. Grasp a handful of bedding and squash it firmly in your hand. You should see only a few drops of water. If you can’t, then your worm farm may be too dry. The material will also clump together if it is too wet, or it will feel sandy and crumbly if it is too dry.
Using a Moisture Meter – For a more precise measurement of the moisture level in the worm bin, a moisture meter is recommended. The idyllic moisture level of worm bin bedding is about 60%-75% moisture content. Find the average of several places for a more accurate result, as the contents in the worm bin are not consistent.
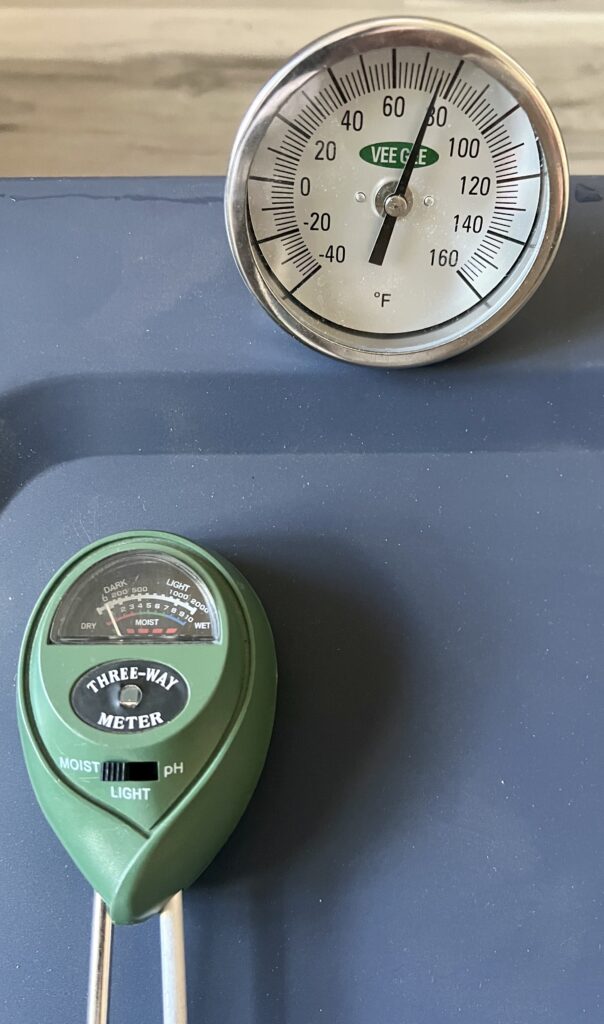
Bottom is a Three-Way Meter. Moisture, Light and pH Meter
Too Wet
Too much wetness can kill your worms. If your worm bin is too wet, the worms will seek dryer conditions. And if you notice your worms are becoming pale in color or are scraggly then your worm farm moisture levels are probably too elevated.
A wet worm bin may cause a slowdown in worm productivity. And even worse it can become a stinky mess of anaerobic activity which may spoil your entire bin. You might also see some white maggots appear as they prefer sloppy conditions. The acidity in the worm bin may increase due to the anaerobic conditions. In this situation, it is also common to see lots of fungal growth. In addition, too much moisture makes it tough to harvest worm castings and separate the worms from it.
What Causes a Wet Soggy Worm Bin?
A wet and soggy worm farm may be the result of:
Adding too many foods that are high water content
Adding too much water – You should not need to add any extra water into the worm bin. There should be enough moisture supplied by the food scraps added.
Insufficient bedding – Fresh bedding helps to soak up any excess moisture. If you don’t continually top your worm bin with fresh bedding as it disappears, any excess water will have nowhere to go.
Solutions
The quick solution is to add some dry paper or cardboard on top of the bedding to soak up excess moisture. You should also check the drainage of the worm bin to ensure there are no blockages. Stop adding food for a while so the bin can dry out a bit more. There should be enough moisture provided by the food scraps added.
The longer-term solution is to add lots of bedding material such as straw and paper. And more importantly, make sure you are not over-feeding the worms as this can cause excess moisture.
Moisture Content of Food
Be conscious of the water content of foods that you add into the worm bin.
Aside from the list foods that you should be feeding your worms, you need to be aware of the water content of foods as well. Feeding too many high moisture foods such as zucchini and watermelon can cause a worm bin to become too moist.
Maintaining a Worm Bin.
Most organisms need a balanced diet, and earthworms are no exception. They prefer a balanced diet of cellulose carbohydrates, fat, protein, and minerals. This diet sounds much like our own—- and it is. The organic material that is fed to worms is usually referred to by worm growers as “feed stock” it is usually a nitrogen-rich material that also provides energy to bacteria in the bin. In some cases, the feedstock and the bedding material are the same, but this isn’t always the case. Most feed stocks are very high in moisture and lacking in bulk these foods softened quickly and don’t provide enough space for oxygen to get down into the bedding material.
Most people start a home for vermicomposting systems so they can recycle the kitchen waste they produce. Vegetable wastes provide a basic vegetarian diet that is perfect for worms in a home vermicomposting system. So, what do you feed your worms?
Food examples:
- Vegetables
- Fruits
- Coffee grounds
- Cornmeal
- Cereal
- Rice
- Tea leaves and tea bags
- Plain bread
- Pasta
- Melon (a worm’s favorite)
- Brown sugar
- And many more!
Foods to avoid or limit:
- Citrus
- Meat and bones
- Garlic
- Hair
- Wood ashes
- Pet feces
- Fresh green wastes and fresh manures
- Oil
- Salt
- Absolutely no metals, foils, plastics, chemicals, or soaps should be placed in the worm bin at any time.
Here’s a list of fruits and vegetables and their percentage of water content for reference:
| Fruits and Vegetables 92% – Watermelon and strawberries 90% – Cantaloupe 97% – Pineapple, oranges and raspberries 91% – Grapefruit 88% – Peaches 86% – Apricots 85% – Blueberries 84% – Apple, pear and tomatoes 81% – Cherries and grapes 74% – Bananas 96% – Iceberg lettuce 95% – Cucumber, celery, zucchinis and radish 93% – Green cabbage 92% – Peppers, cauliflower, eggplant, red cabbage and spinach 91% – Broccoli 87% – Carrots 79% – Green peas |
Red wigglers like a temperature of 55-77 degrees with 68 degrees being optimal. Below freezing and above 86 degrees could kill them.
Locate the worm bin in a quiet, convenient spot that is within their temperature range. Feed worms once or twice a week depending on how much food is already in the bin.
Add the food to different areas of the bin.
Changing the Bedding
After a few months you will want to separate the worms from the bedding and give them new fresh bedding. If there are too many casts in the worm’s bedding, they will not be healthy.
Old bedding can now be used as vermicompost on your plants.
A couple of ways to sort worms from the castings are:
1. Dump contents of the bin on a piece of plastic. Leave as one big pile or divide into smaller piles. Worms will work their way down into the pile. Skim the top layer off the pile. Keep doing this until much of the old bedding is separated.
2. Put the remaining worms into the new bedding. Let the worm sort themselves. Pull the bedding over to one side of the bed. Put fresh bedding on the other side of the bin. Only feed the worms on the side of the fresh bedding.
Other Tips
- You can drill some holes all along the top and sides of the bin to increase both airflow and evaporation as needed.
- When feeding your worms, always add some extra worm bedding.
- Maintain a nice thick dry layer of bedding on the top. Keep topping the bedding up as it gets moistened and shrinks down.
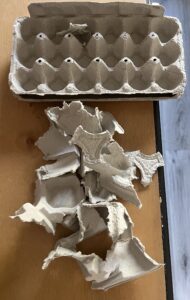
- Add ground-fine egg shells to the worms food and bedding. Consuming the powdered egg shell provides grit the worms need to help process their food. As a bonus it also adds calcium to the composted food scraps.